
EYEBROWS!! EYEBROWS!! EYEBROWS!!
What is with this new trend of thick and bold eyebrows that's taking the world and the make up industry by storm! I mean, literally everywhere I go whether its the mall or maybe just walking in the corridor at school all I hear is, " eyebrows on point", ''eyebrows on fleek''. So if you feel like you're missing out because you have barely one strand of hair.. shame.. jk..HAVE NO FEAR!
HERE IS A DIY ON HOW TO FILL IN YOUR EYEBROWS TO GET THAT CARA DELEVINGNE LOOK!

1. PLUCK AWAY ANY STRAY HAIRS IN BETWEEN YOUR EYBROWS.

2. TRIM ANY EXCESS HAIRS ESPECIALLY IF SOME OF YOUR BROW HAIRS ARE LONGER THAN ITS NATURAL BROW SHAPE.

3.UNDERLINE UNDERNEATH YOUR BROW, START WITH SMALL STROKES NOTHING TOO DRAMATIC.

4. NOW, MARK YOUR STARTING POINT WITH ANY EYELINER.
5. FIND AND MARK THE END OF YOUR BROW AND PLACE YOUR EYE PENCIL DIAGONAL FROM THE OUTSIDE CORNER OF YOUR NOSTRIL.

6. FIND YOUR NATURAL ARCH, STILL PLACING THE EYE PENCIL DIAGONAL TO YOUR NOSTRIL.

7. CONSIDER YOUR SKIN TONE, USE THE CORRECT EYELINER AND POWDER TO COMPLIMENT YOUR SKINTONE.

8. BEGIN FILLING YOUR BROW WITH POWDER, USE A SMALL ANGLE EYE BRUSH, FILL ACCORDING TO THE DIRECTION OF YOUR HAIR GROWTH.

9. MOVING FROM THE ARCH, START OUTLINING TO THE EDGE OF YOUR BROW WITH LIGHT BRUSH STROKES.

10. BRUSH OUT THE COLOUR USING A SPOOLIE BRUSH.

11. SLAY!
HEY THERE MATRICS, EXCITED FOR YOUR DANCE?
Maybe a little stressed too because you are hopping from shop to shop for that "'wow factor'' dress or maybe shopping for a partner who knows? but one thing you have got to get right is your make up!
Ever heard of @everythingsah, well her name is Sahaar(ex rustybug) and she is absolutely talented in applying outstanding and fabulous make up, I mean just look at it this!

SHE TEACHES MAKE UP CLASSES FOR R350 ONLY! AND DOES MAKE UP FOR EVENTS BETWEEN R350-R400! GET HOLD OF HER NOW PEOPLE: 0711930208 x
By: Eugenia Twumasi x
Summer is here! Warm sunshine, days at the beach, pool
parties...a wonderful, sunny season. But the sun isalso dangerous and leaves many of us feeling dehydrated
with our skin feeling dry. Here is the perfect
solution!Many of us enjoy making a delicious fruit
salad as a snack...but, STOP! Don't eat it yet! Instead
of eating the fruit, here are steps to make a
refreshing, fruity facial mask to rejuvenate your skin
and give you that glowing, summer look.
Strawberries and Cream!
Let's make a dessert...of your face!You will need:
• 4-5 strawberries
• Honey
• Whipped cream
1. Mash the strawberries in a bowl with a fork.

2. Add a teaspoon of honey and two teaspoons of whipped
cream. Mix until you have a paste.


3. Apply to your face. Leave on for 20 minutes and then
gently wash off with a sponge. Enjoy!

Eat the Orange as a Meal, then use the
Peel!
Have you ever heard of using orange peels as a face
mask? It may be unusual but the results are proven to
be amazing. If you don't believe it, then give it a
try!
You will need:
• Orange peels
• Yoghurt
1. Peel an orange(feel free to eat the orange!) and
leave the peels in the sun for 2 to 3 days.

2. When the peels are dry, use a blender to grind them
into fine powder.

3. Mix this powder with a tablespoon of yoghurt until
it forms a smooth paste.

4. Apply this to your face for 20 minutes. Gently
remove mask afterward. Be amazed at the results!
Give these masks a try! Don't forget to moisturize well
in this summer heat, drink plenty of water and apply
lots of sunscreen. Enjoy summer!☀ ️☀ ️☀ ️

-Farah Shaik
THE INVERSION METHOD
What would you do to grow your hair? Eat super healthy? Take a
basketful of vitamins and supplements? Drink eight to ten glasses of water a
day? Buy expensive hair products or growth aids? How about a handstand?

What if it would give you an inch of hair growth in only seven
days? Ok, maybe not a handstand, but you get the point … Don’t laugh. Inversion
therapy has been around for thousands of years. To some this will sound interesting, for others bad
science and for a few of you, you might be tempted to give it a go.
THE STEPS
1. Massage an oil of your choice (that has been warmed) onto
your scalp. Olive oil is recommended, but you can experiment with any oil you
have on hand.
2. Do a simple inversion for 4 minutes. (Suggested positions:
(i) sitting in a chair or on a couch and lowering your head slightly toward
feet as if you are painting your toe nails or (ii) standing at kitchen sink and
lowering head as if you are getting ready to wash your hair.)
3. Let oil sit on scalp for at least two hours. Co-wash to
remove excess oil (only if necessary).
4. Repeat every day for ONLY 7 consecutive days (i.e., Sunday to
Saturday).
5. Wait at least 3 weeks between each attempt. Otherwise, your
body gets used to the extra blood flow, and the method won’t work as well. Or,
at worst, you become susceptible to some
dangerous
health risks. So, only attempt to do this over seven consecutive days once per
month. No more!
6
.Enjoy your new growth!

-by Ardine van Zyl
One of the latest trends is the universally known cat's eye and has been
seen on many celebrities including Taylor Swift, Angelina Jolie and Scarlett Johansson. The cat's eye is a bold and beautiful look which comes in many
variations.

However, some of us do not
know how to do even the simplest cat's eye so here's how:
Black liquid eyeliner
works best for this technique but a sharp eye pencils
will work too.
How to do the perfect Cat's Eye
Step 1
• Apply
your usual eyeshadow to your eyelid.
• Make sure that you use a neutral tone,
preferably a shade lighter than
your skin tone.

Step
2
• Highlight your eyelid and apply a darker shade of eyeshadow to the outer
edges of your eyelid.

Step 3
• Use your eyeliner to create a line along the top of your eyelid and use
dots to direct the "flick" upward at the edge of the eye.
• If you don't know the angle at which your eyeliner should go, simply
follow the bottom line of your eye upward.

Step 4
• Connect
the dots and fill in with eyeliner.
• Make sure your hand remains steady so as to keep
a straight, smooth
line.
• The thickness of your cat's eye is left up to you but make sure you
leave no gaps.

Step 5
• Apply your usual eyeliner to the bottom of your
eye and if you would like to, apply mascara.
This will emphasize your eyes and add to the boldness of this look.

Step 6 (optional)
• If you get bored with the normal cat's eye then you can add some
creativity and fun with these tips:


• Use your liquid eyeliner to create another line slightly above the first
to give it a disconnected look.

- Add some glitter to your eyelid for that extra sparkle

So go wild and be creative because spring is all about fun!
-Farah Shaik
(Pictures from wikihow and
google)
2014 the year of the hair
It seems like this year everyone is intent on trading their
long locks for a more easy-breezy look, myself included. So if you’re thinking
of joining the club, here is a helpful tip when choosing your new hairstyle.
Always make sure the hairstyle you choose suites your face, therefore it is
imperative to know what face shape you have.
How to determine your face shape:
How to determine your face shape:
Heart Face:

Characteristics: Wider at forehead and hairline, and narrowing down to a
small pointy chin.
Haircut & Style:
- Layered bob with extra volume and outward flicks at chin level.
- Asymmetric cuts are also flattering heart-shaped faces.
- Curls and waves are helpful.
- The best length is chin-length or longer.
- Adding a wispy bangs will enhance the overall look and balance the wider forehead.
- Adding height and volume around the temple is not a good idea!
Round Face:

Characteristics: Wide, short forehead, full jaw and round chin.
Haircut & Style:
- Most short hair cuts works well for round face as long as there is some height at the crown area and little fullness above the ears to slim down the round face.
- A soft cut with sophisticated layers coming forward onto the face look stylish and is an ideal hair style for round face shape.
- Soft curls will also flatter the frame of a round face.
- For straight hair asymmetric cuts can also be an option.
- Rule of thumb: "Consider any style that could break the symmetry and roundness of your face".
Square Face:

Characteristics: A wide, short forehead with a square jaw that is in line
with your cheekbones.
Haircut & Style:
- Square edges should be softened by breaking the symmetry of a square shape (off-center parting and side curves).
- Layers with some volume at crown and soft curls looks stylish on this type of face shape.
- Avoid straight, blunt or heavy bangs.
Oval face:

Characteristics: High forehead and narrow, slightly rounded chin.
Haircut & Style:
This is the most balanced face shape and almost perfect for
any length and type of hair style. Just consider styles that work best for your
hair type and age.
Long Face:

Characteristics: Long face with high forehead and long jaw and chin. Other
face shapes that appear long are Rectangle and oblong.
Haircut & Style:
- Suited styles are like chin or shoulder-length cuts with a fringe that can disguise the long forehead.
- Haircuts that are shorter on back and longer on front also works with this type of face.
By: Kauthar Achmat
“Power Brow”
Be it model de jour Cara Delevinge or Audrey Hepburn
look-alike, actress Lily Collins; their “brows” have definitely been inspiring
brow envy everywhere. Their au naturel look has inspired many to swap their
waxes for brow tints and their tweezers for a trusty brow pencil. But fear not!
Through the use of this simple method you too could have these “perfect brows”
How to achieve naturally full thick brows:
Step 1: Using a spoolie (an eyebrow shaping tool that looks like a mascara wand), brush your brows out and up, away from the center of your face.
.jpg)
Step 2: Lightly wet the end of your chosen angle brow brush.

Step 3 : Sweep the dampened brush directly into the eyeshadow.
.jpg)
Step 4: Using the brush apply your brow colour in short, hair like strokes.

Step 5: Run the spoolie over the eyebrows once to soften any harsh lines.
.jpg)
Step 6 : Use a soft brow highlight underneath the arch of the brow bone to subtly accent the brows.

and voilà!
by: Kauthar Achmat
It's all in the brows
Bold and statement eyebrows are very trendy at the moment, but with all the different shapes, which one is for you? And how can you get that shape by yourself at home without taking off half of your eyebrow...

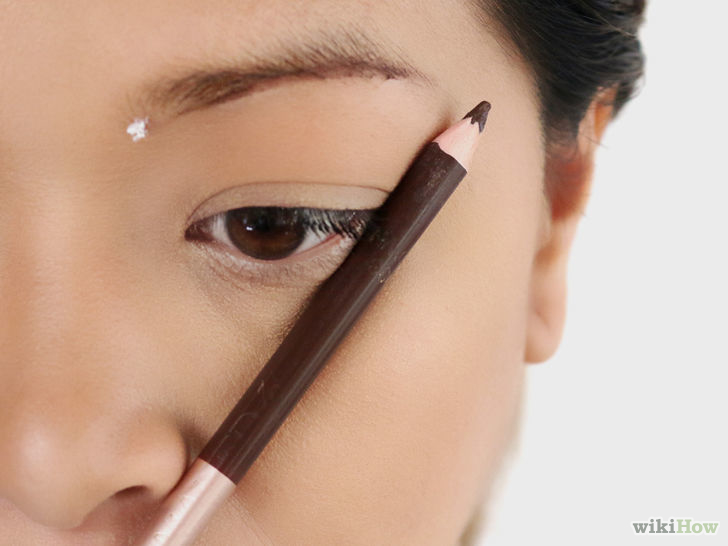
These are the angles every girl HAS to know

1) Outer edge of nose/nostril straight up is where your brow should start
2) Straight line from outer edge of nose/nostril through the pupil is where the arch should be
3) Straight line from outer edge of nose/nostril to corner of eye and extended up is where your brow should end
4) Straight line from start to end of brow should be perpendicular to the straight line from nose to start (1)
By: Stéphanie
Get the Great Gatsby look:
by Stéphanie Pereira

Simple step-by-step DIY Great Gatsby smoky eyes

Step
1: apply the 'foundation' layer (just a light eye shadow to prepare the area)
Step
2: use a dark shade in a 'C-motion' emphasizing the 'eye ball'

Step
3: use a light shade from the inner corner of the eye and blend it in with the
darker shade
Step
4: outline the bottom of the eye with the same, light shade

Step
5: with an eye pencil, draw a thick line above the eyelash
Step
6: outline the bottom of the eye

Step
7: use a water based compact eyeliner to emphasize the shadow below the eye to
really make your eyes POP
Step
8: do the same for the top of the lashes

Step
9: with a very light, shimmering colour, blend the makeup, focusing on the
corner of the eyes.
Step
10: do the same for below the eye

Voila ! And there you have the Great Gatsby smoldering smoky eye look
xx
Spring is back and so are Braids ♥
by Kauthar Achmat

Still rocking the messy bun , high pony tail , and side braid? Us too and it's about time we mix things up! Because it's Spring and we have better things to do than blow out our hair. Here are some how-to's of the funkiest spring braids we found on the web.


Double Braid: Upgrade your messy bun look by adding these chic braids.

 |
| Milkmaid Braid: This messy yet sophisticated look is perfect if you have short hair. |

Heart braid : This braid is perfect if you wish to try something new and unusual.


Go dramatic this winter by wearing the dark lipstick trend.
Stylist: Nuzhah Jacobs
Make-Up Stylist: Stephanie Pereira
Photographer: Laura Heartmann
Lipstick: Vixen by Yardley


